
UNLE⛧SH THE BEAST ト何ゼ
| [MENU] | |||||||||
| [THOUGHTS] | [TECH RESOURCES] | [TRASH TALK] | |||||||
| [DANK MEMES] | [FEATURED ARTISTS] | [W] | |||||||
DevSecOps Series IV - DAST
April 21, 2025 // echel0n
Hello guys! Welcome to the fourth post in the DevSecOps Series! In this blog, I will explain what DAST is, why it is useful, and then walk you through a local OWASP ZAP setup integrated into a Jenkins pipeline.
Table of Contents
- Used Tools, Tested Hardware/Software and Warnings
- DAST - Dynamic Application Security Testing
- The Action - Installation of OWASP ZAP
0 Used Tools, Tested Hardware/Software and Warnings
Some configurations here and in the repository I referenced may be insecure, and it is recommended that you act with awareness. Since this is a lab environment, we will not be making many security configurations of the tools.
These are the tools we will be setting up. (Check previous blogs if something is missing!)
- OWASP ZAP as a DAST Solution
Provided configurations are tested in this hardware and software;
- CPU: AMD Ryzen 9 5900X (24) @ 5.619GHz
- Memory: 23904MiB
- Swap: 4GB
- OS: ArchLinux 6.13.8-zen1-1-zen
- Terminal: 5.2.37
- Docker version 27.3.1, build ce1223035a
- k3s version v1.31.3+k3s1 (6e6af988)
- go version go1.22.8
This setup is using a lot of resources. Be careful after deploying the tools, as they can quickly exhaust your resources. Do not forget to save your critical data while the instances are running. I am pretty new to Kubernetes so I am open to fine-tuning suggestions, please feel free to get in touch, it would be great to learn more!
1 DAST - Dynamic Application Security Testing
1.1 What is DAST?
DAST tools are the successors to traditional vulnerability scanners, and they have been around for over a decade. However, this time, these scanners are allowing users to configure and scan more often and -plus- works standalone, unlike the previous ones that are named as vulnerability scanners.

Unlike SAST, this time, these tools are dynamically engaging with the application, running somewhere. In TLDR; DAST tools are just selenium tasks with pre-defined security sauce. Typically, they are not just like "throw it onto application and expect best results" type of software. The DAST solutions are expecting heavy customization. To get better results, you have to define the application's information such as; backend engine, database engine, operating system, required cookies, authentication scenario to make it more robust. The vulnerability scanning capability is not limited to the application itself, you can obtain information about its components too. Thus, you can test the security of your application's deployment to some extent. However, let's not forget that our focus here is on the application itself.
1.2 How?
Actually I do not know the direct answers and how they are built. I think that mostly depends on parsing the responses from the application and gathering passive information. It should include;
- Crawl the website
- Do the directory busting, using custom dictionaries.
- Gather information about server
- Get help from what you just defined (You can import some postman, burpsuite and swagger documents)
- Do something that is pre-defined and check the results
1.4 Basic mind-set of Review of DAST Findings
You and the inventory define the context. Most of the time, you are the one making the decisions, so it is up to you to determine whether something is relevant or not. For instance, I personally do not worry about cookie security if the target is in development environment. Another common case: DAST tools might report vulnerability in components like jQuery, but when you look into the CVE details, it may turn out the vulnerable function is not even used -and never will- in your project, so it is safe to ignore. Bottom line; you need to perform your own threat assessment and decide what actions, if any, are necessary.
1.4 Some Caveats
1.4.1 Every DAST solution is failing with their own style!
Sometimes, the solution will not allow you to customize enough, it will not cover a lot of pages, endpoints and stuff. Sometimes, the issue tracking mechanisms are poor, and you might lose track of the findings. They all have their strengths and you need to choose based on that. This usually has a pay-to-win approach, usually more money means more better UI/UX and flexibility, it would not be wrong to say that.
1.4.2 Out-of-the-box configurations will not be enough to cover all applications functionality
1.5 The Benefits
1.5.1 More earlier a vulnerability is fixed in the SDLC, the cheaper it gets.
1.5.2 You will be able to discover deployment vulnerabilities and server configurations.
1.5.3 You will be able to uncover some component weaknesses, so basically you will also have a primitive SCA too!
2 The Action - Installation of OWASP ZAP

I will just demonstrate how a minimal DAST looks like. It is not that I do not want to show a more advanced setup, but free DAST solutions often struggle to deliver meaningful results, especially due to limited CI/CD support and poor default configurations. OWASP ZAP meets these demands almost mediocrely, so I will.
Since I will be using it (and probably you) on own computer and my resources are very limited, I will be using OWASP ZAP in our pipeline in a way that is not very suitable for a real scenario.
OWASP ZAP has a docker image that is available to pull and install. Run this command for once then you ready to integrate it into Jenkins;
- docker run --rm -v /tmp:/zap/wrk:rw softwaresecurityproject/zap-stable zap-baseline.py -t http://the-url-can-be-non-existed.com/ -r zap-report.html
Check if the zap-report.html file is created and if you entered a valid URL, you should see some issues in there.
The pipeline integration will be based on direct scanning and saving outputs to review in future. We will be experiencing it in its most primitive form.
- stage('Run ZAP Scan via SSH') {
- steps {
- sshagent(credentials: ['SSH_LOGIN_HOST']) {
- sh """
- echo "Starting ZAP scan...";
- ssh -o StrictHostKeyChecking=no root@${KUBERNETES_HOST} '
- docker run --rm -v /tmp:/zap/wrk:rw softwaresecurityproject/zap-stable zap-baseline.py \
- -t ${DEPLOYED_URL} \
- -r zap-report.html;sleep 5;
- '
- echo "ZAP scan finished.";
- """
- }
- }
- }
-
- stage('Fetch & Archive Report') {
- steps {
- sshagent(credentials: ['SSH_LOGIN_HOST']) {
- sh """
- scp -o StrictHostKeyChecking=no root@${KUBERNETES_HOST}:/tmp/zap-report.html zap-report.html
- """
- }
- archiveArtifacts artifacts: 'zap-report.html', fingerprint: true
- }
- }
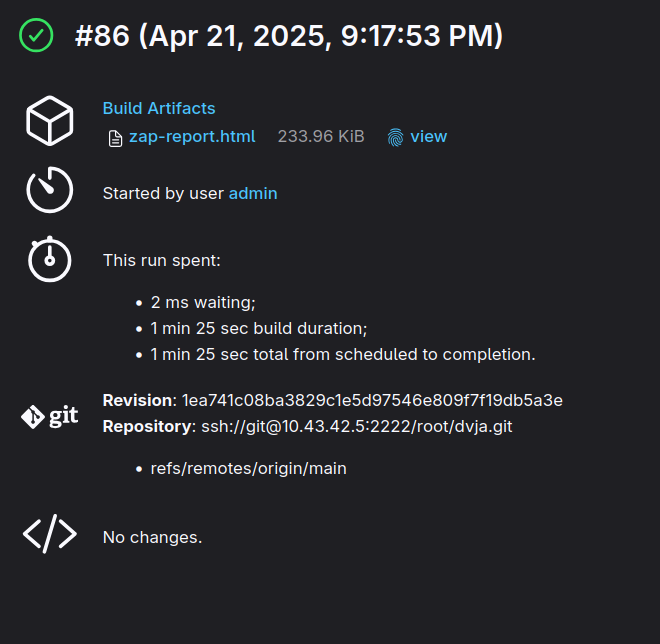
First we will SSH into host machine then run the scan in a docker container and save it into mounted volume which is /tmp/ to save the output in future steps. Then at second step, we are just saving the output file, making it accessible to review for each build.
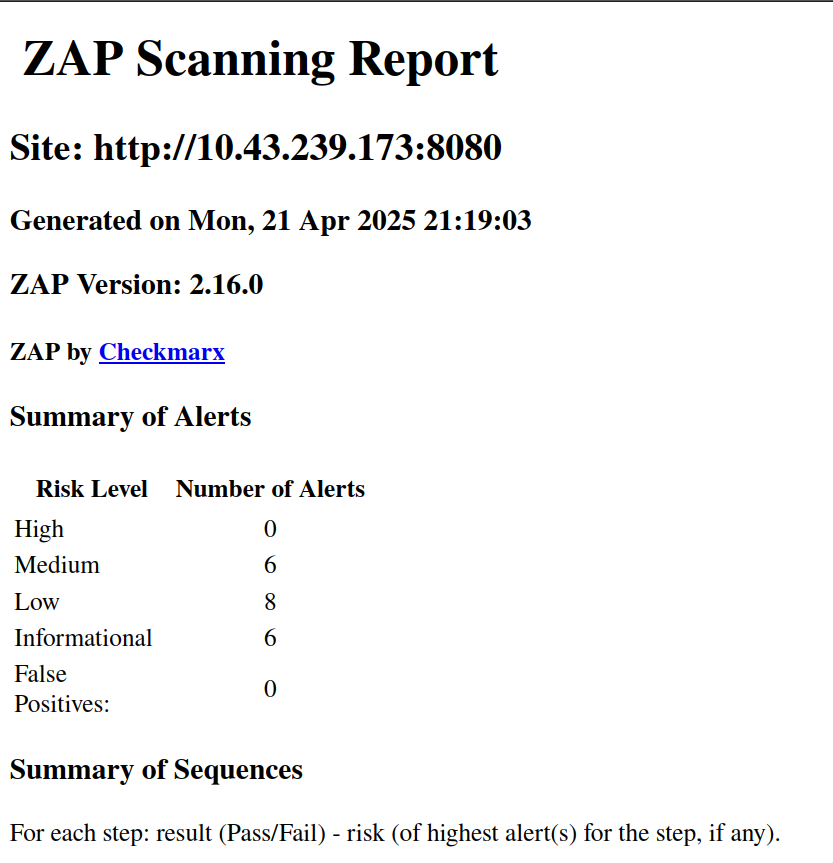
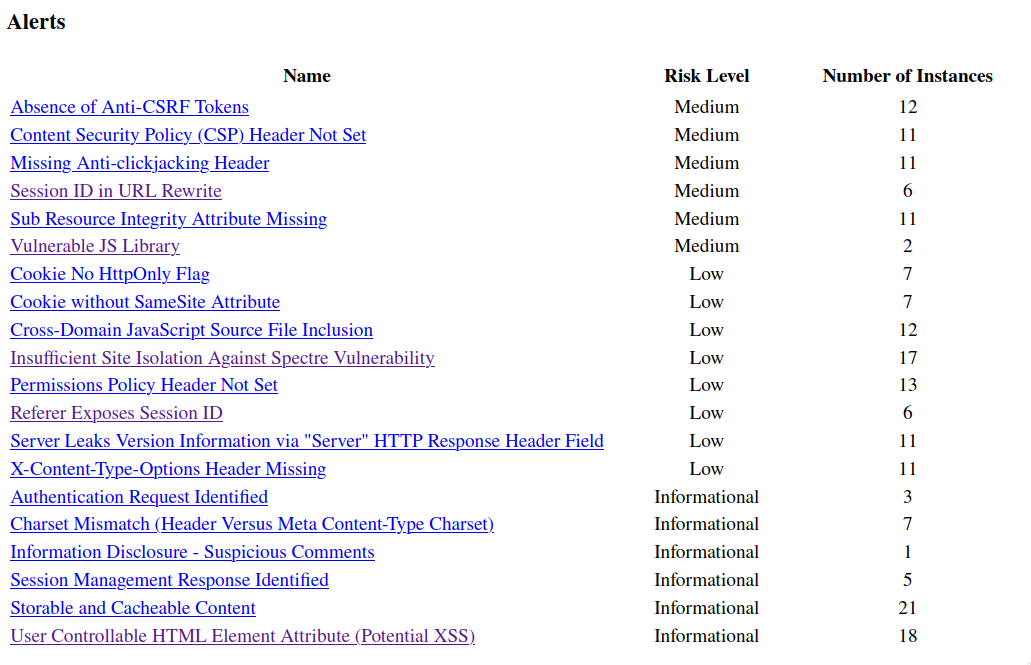
After the pipeline run; you can check the result from here.
It seems like many issues were detected, but SQL injection was not among them. Still, if DVJA were a real application, you would likely want to review those alerts. they could pose a risk depending on your threat model.
3 The End - Conclusion
Although the out-of-the-box configuration failed to detect the SQL injection, this basic setup still holds value. With any other commercial DAST solution surely will help establish a security baseline, can deter script-kiddies from exploiting low-hanging fruits, and gives you a general idea of your application's basic security posture. While it is not silver bullet, it is a useful first step in a broader security strategy.
That is all for now! Thanks for finding my blog interesting enough to read. Have a nice day, you absolute legends! 🎉
References and Links
- First Part - https://devilinside.me/blogs/devsecops-series-introduction
- Second Part - https://devilinside.me/blogs/devsecops-series-simple-pipeline
- Third Part - https://devilinside.me/blogs/devsecops-series-iii-sast
- Provided Configurations and Scripts - https://github.com/echel0nn/devsecops-series